LAMAR LED SUPPORT & RESOURCES:
Frequently Asked Questions
-
- Check to make sure there is power going to the fixture. All of our LED drivers (except fixtures intended for POE connection) operate on 120-277 volt AC power. Some units for Canada may contain 347 volt drivers. Ensure that the disconnect plug is fully connected.
- Check for proper polarity, black from driver is (+) AC power input, white wire is neutral (-).
- Most LED drivers we use are NOT suitable for use with Triac or other line voltage type dimming controls. Connection of AC power leads to any type of dimming control may damage the driver and void the warranty.
- Purple and gray wires are for connection to 0-10 volt type dimming controls only! Connecting these wires to AC power will cause driver failure and void the driver warranty.
- Make sure LED board disconnect is plugged into driver – many models contain these to facilitate easy removal of the LED board trays during fixture installation.
- If equipped with one piece emergency battery backup, ensure that the small battery connector plugs are connected to each other. For two part battery backup units ensure that the charger module in plugged into battery pack.
- Check wire connections at the driver – these are often poke-in type terminal connections which may have loosened during shipping and handling.
- Check connections at the boards – connections are made by pushing the wire into the terminals at the ends of the board arrays and may loosen or dislodge during handling or shipping. If one board lights on a two board array, check that the interconnect wires are fully inserted into the connectors. This applies to the connections between the individual boards as well. Some board to board connections are made with interconnect pins. The pin should be centered between the connectors. Intermittent operation of one board may be caused by incomplete connection between boards as the board temperature increases during operation.
- LED boards may be wired in parallel, series or a combination of the two. DO NOT ALTER FACTORY WIRING!
- Contact factory for LED board and driver replacement parts. Most LED drivers we use require programming on specialized equipment to set drive currents and other operating parameters to match the exact board type installed. DO NOT INSTALL ‘OFF THE SHELF’ DRIVERS or LED boards without confirming the proper drive currents, wattage and forward voltage.
-
Custom Tuning is offered (free of charge) for the vast majority of Lamar LED products. At Lamar, we typically offer products in Low, Med or High output and these have specific lumen output values depending on the product – this gives our customer a simple choice of lumen outputs without having to be lighting experts or choosing between dozens of lumen packages.
That being said however, we will accommodate specific requests where the customer has to meet a specific lumen output requirement for a specific job or application, thus – Custom Tuning.
At Lamar LED we use programmable drivers in most of our products (and can always switch to one if need be). What this means is that we have the capability of changing or altering the output current of our drivers (via programming software and tuning interface) to tell the LED Array’s (boards) to deliver more or less light to accommodate our customers specific lumen requirements. In fact, this is something we do on a daily basis so go ahead and ask – if you don’t see what you want, we will program it for you!
-
MCT or Multi-Color Tuning is available on Lamar LED fixtures and offers the end-user the opportunity to change the correlated color temperature of the LED’s in the field. With the flick of a switch, located on the individual LED board arrays, the LED’s can be toggled to provide one of three popular CCT’s – 3000K, 3500K or 4000K (warm to cool).
That being said however, we will accommodate specific requests where the customer has to meet a specific lumen output requirement for a specific job or application, thus – Custom Tuning.
At Lamar LED we use programmable drivers in most of our products (and can always switch to one if need be). What this means is that we have the capability of changing or altering the output current of our drivers (via programming software and tuning interface) to tell the LED Array’s (boards) to deliver more or less light to accommodate our customers specific lumen requirements. In fact, this is something we do on a daily basis so go ahead and ask – if you don’t see what you want, we will program it for you!
-
What can you do if after you received your new LED light fixture and you realize they might be a little too bright for your comfort – This happens all too much in the “new” world of LED lighting fixtures.
Fortunately there may be help. First you can install a dimming system if your fixture is equipped with a 0-10V dimming driver (or other type), if you don’t have the necessary wiring in place you will probably have to run 2 add’l low voltage leads back to the switch (dimmer) in order to turn the lighting down but chances are you already have the capability (although there is no guarantee your fixture is equipped with a dimming driver there is a very good chance it is)
Another option, if running wires is out of the question and you do indeed have a 0-10v dimming driver in your fixture, is to place a resistor in-line with the dimming leads (or between the dimming terminals if it is the poke-in type). This is a relatively low cost alternative to running separate low-voltage leads although they are not “adjustable” like having them on an actual dimmer.
At Lamar LED we can recommend the proper resistor value based upon the percentage you might want the light in the space reduced and although it will mean someone has to open the fixture and install the resistor manually on each LED driver this solution has proven helpful for many customers since the inception of LED lighting fixtures.
-
Correlated color temperature (CCT) will tell you what hue and tone of white to expect from a specific bulb or fixture. CCT is measured in Kelvin (K), which is similar to degrees in Celsius. Different temperatures on the Kelvin scale represent different colors. For example, light at 2000K-3500K looks more orange/yellow and is called ultra warm or warm white, and as temperature increases in Kelvins, color changes to more of a “paper white” known as natural or neutral white (between 3500K and 5100K) and finally into a bluish-white known as cool white (5100K-20000K).

The Kelvin Scale in Action:
-

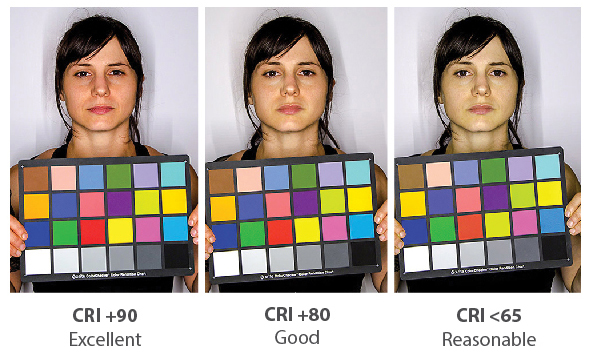
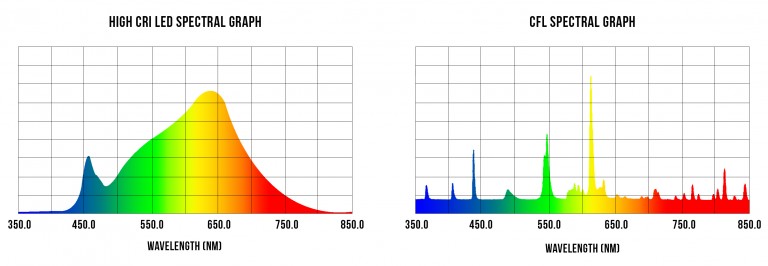
The Color Rendering Index in Action When it comes to lighting areas where color accuracy is crucial, such as portrait studios, retail stores, hospitals, medical and commercial offices, display cases, and warehouses, a high color-rendering index (CRI) is key. CRI refers to how accurately a light source reveals the true colors of objects, people, and surroundings and involves a distinct testing method with comparisons to incandescent light or daylight. The spectral graph below can be helpful in understanding the advantage of high-CRI light sources. Lights with a low CRI will show fewer colors while high-CRI lights cover more of the spectrum. A light source’s ability to show more colors increases its accuracy in revealing the true colors of people, objects, and surroundings.
CRI was created by the International Commission on Illumination (CIE), a lighting standardization body, to define how accurately a light source reveals the true colors of objects, people, and surroundings. The chromaticities of eight different pastel colors are compared against one another when illuminated by a given light source and a reference light. Reference lights are chosen based on the correlated color temperature (CCT) of the light that is being tested. The reference light is a blackbody (incandescent) if the light source has a CCT of less that 5000K, and if CCT is more than 5000K, the reference light is daylight. The average differences in chromaticities are subtracted from 100 (the CRI of daylight and incandescent light), and that number is defined as the CRI of the light source. A light source with a CRI close to 100 shows colors very similarly to how its reference light shows those same colors. High-intensity discharge (HID) lights typically have a CRI rating close to zero; fluorescent lights have a range in the lower 60s and below, and LED CRIs can range from 70 to 98.
Accurate color rendering can be achieved with a high-cri light strip, can light, bulb, or other high-CRI bulb or fixture. Lights with a CRI of 80 or higher are considered to show colors most accurately. The photo below shows how different CRIs can affect colors and skin tone.
-
When it comes to lighting—it’s all about lumens. But what are lumens, exactly? And how do you understand what are lumens in light bulbs and light fixtures?
The lumens definition is: “a unit of luminous flux in the International System of Units, that is equal to the amount of light given out through a solid angle by a source of one candela intensity radiating equally in all directions.”
To simplify: Lumens equals brightness!
And watts measure energy use, not light output. With new, energy-efficient LED technology, we can no longer rely upon wattage to indicate how bright a bulb is. See how to measure lumens below:
How Many Lumens Do You Need? More Lumens = More Light
If you used to buy this in incandescent Look for this much light in lumens LED (most efficient) CFL (more efficient) Halogen (more efficient incandescent) 100 W 1600 up to 22 W up to 26 W up to 72 W 75 W 1100 up to 20 W up to 23 W up to 53 W 60 W 800 up to 12 W up to 15 W up to 43 W 40 W 450 up to 9 W up to 11 W up to 29 W Lumens vs Watts: Output and wattages based on most common products available for each medium screw-based light bulb. Actual light output may vary by product.
Use the chart above to determine exactly how many lumens are in a watt and vice versa. This should provide you with a good understanding of how bright 120 lumens is vs. a fixture with 5000 lumens.
-
Often a fixture becomes inoperative due to causes not attributable to the ballast. It is therefore important to examine all fixture components before removing the ballast for replacement. We recommend the following general procedures for both magnetic and electronic ballast.
- Replace or check all lamps to ensure satisfactory operation.
- As lamps are removed, examine all sockets to ensure they are not damaged or broken and are making proper and positive contact with the lamps.
- Examine all electrical connections within the fixture, including at the lamp sockets, to ensure conformance with the wiring diagram on the ballast.
-
Cold temperatures usually cause lamplight swirling or spiraling, when the light appears to swirl or spiral inside the tube. This is even more prevalent when “Energy Saver” lamps are used – these often have higher starting temperatures and will not function correctly in colder applications.
In this case, shield the lamps from the cold draft, from air-conditioning or other sources by using a plastic jacket available from distributors. Make sure the plastic jacket (tube guard) is rated for the lamp/ballast combination. It is not advisable to use tube guards with instant start T8 ballasts as high heat from the lamp ends at end of lamp life may cause the tube guards to melt if the lamps are not changed immediately.
This problem may also be caused by low input voltage or lamp and ballast incompatibility. Check the input voltage, which should be the ballast rated voltage +/-7.5% or change the lamp to a known good lamp. If the condition still exists, change the ballast.
